Step-by-Step Guide for Setting Up Your ZipWP Account for Your Hosting Service
In this article, we’ll help you understand how you can set up your ZipWP account in the right way to integrate it with your hosting service.
After your account is set up, you can offer AI website builder to your customers within your hosting service.
Step 1: Sign Up for ZipWP
First things first, please create a new ZipWP account. If you’re subscribed to any of ZipWP’s existing plans, you will need a new account.
Go ahead and register a new account here: https://app.zipwp.com/register
Step 2: Choose Your Plan
If you are a new host just getting started with fewer than 100 customer sign-ups or a requirement of generating up to 500 sites per month, we have special plans for you.

Access them here: https://app.zipwp.com/host-pricing
You have two options: monthly or annual. The annual plan is a great deal because it’s heavily discounted. If you opt for the monthly plan, it’s $149 per month.
However, if you choose to pay annually, it’s $1,188 for the entire year, which works out to just $99 per month. Please choose the plan that works for your needs. If you have any questions, please feel free to ask us at [email protected].
Step 3: Setting Up Host Account
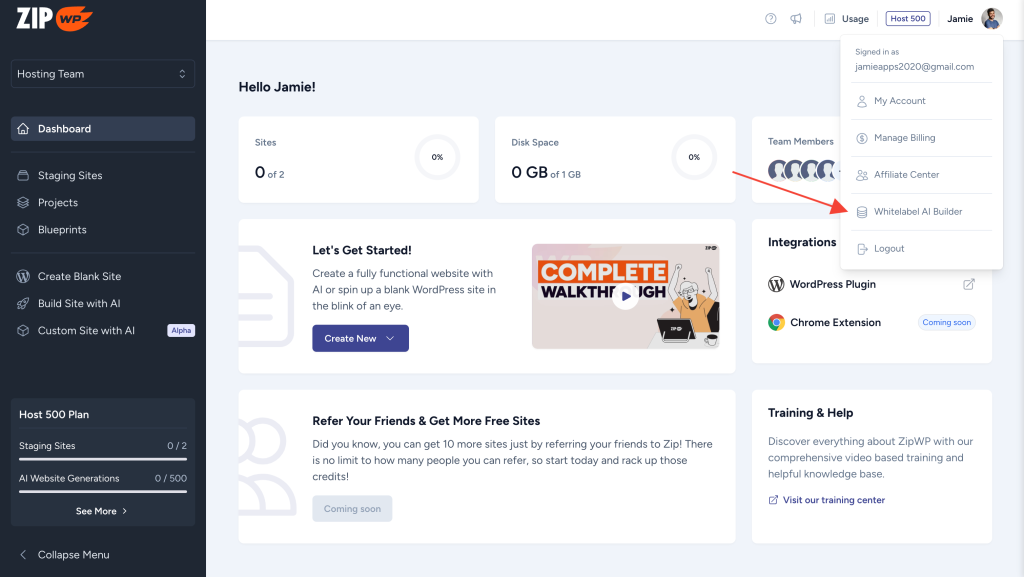
After you’ve made your payment, you’ll see a new menu option called “Whitelabel AI Builder” in your account.

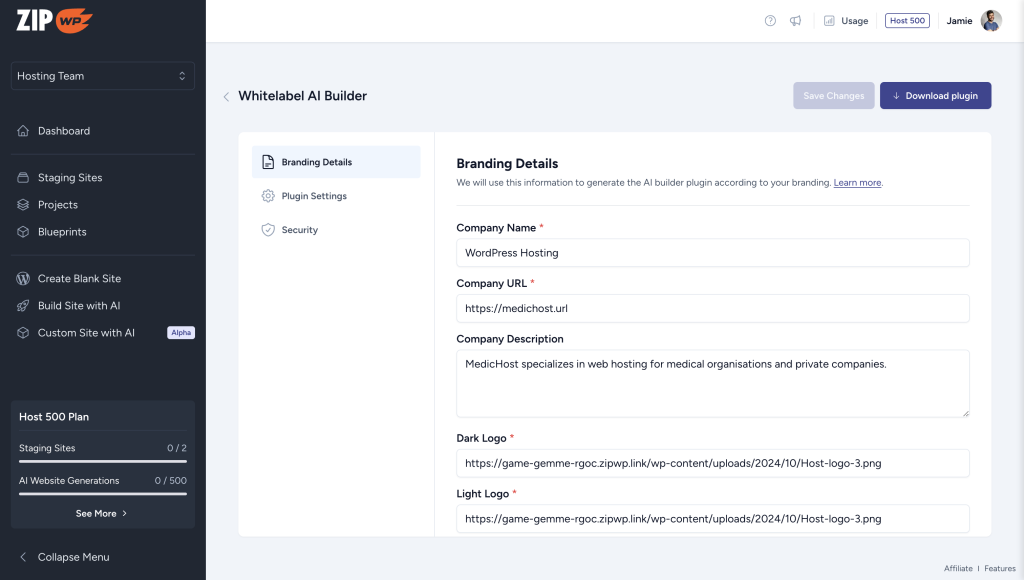
Next, you’ll need to fill in some details to generate a custom plugin just for you. Enter your information here.

Please make sure that you fill these details carefully as they would be displayed in your custom ZipWP plugin.
There are additional settings under “Plugin Settings” and “Security” in your Whitelabel AI Builder dashboard that you can configure. Learn more about these settings here.
Step 4: Downloading & Distributing Your Custom ZipWP Plugin
Once you’ve filled in your details, you’ll be able to download your custom plugin as a zip file named “starter-templates-onboarding.zip”.
You’ll need to install this plugin on each WordPress instance that your hosting service creates. You can do this via WHM, WP Toolkit, WP CLI, or any method that your hosting control panel supports.
For a step-by-step example of how to do this using WHM and WP Toolkit, check out this document.
And that’s it! You can now track how many sites have been generated in the ZipWP dashboard.
We hope that you find this article useful. If you have any questions or concerns, do not hesitate to reach out to us.
We don't respond to the article feedback, we use it to improve our support content.